JAVA Spring applications are a great way to serve an API over the web. But what do you do once you are finished writing the code for your backend?
1. Dockerize
The first step in the deployment proccess is to dockerize the Spring application. For this application, I used JAVA 13, just change the docker source image if you use a different version for your Spring application. The project is configured such that the .jar file is copied into the “out” folder of the project after running “mvn package”.
FROM adoptopenjdk/openjdk13
COPY out/app.jar app.jar

EXPOSE 8080
ENTRYPOINT ["java", "-jar", "/app.jar"]
The Dockerfile is pretty simple, we want to use the adoptopenjdk/openjdk13 image as a base. That way, I can use the “java” command right away.
Next, the .jar file “app.jar” gets copied into the container utilizing the COPY instruction.
EXPOSE is used to indicate that the image listens on port 8080. The instruction does not actually open the port but is used as a form of documentation. For more information, have a look at the official documentation under the section “EXPOSE”.
Finally, the instruction to start the Spring app is added via the ENTRYPOINT instruction. I just used the typical command to start a JAVA application via the command-line: “java -jar”. The single parts of the instructions get passed as a list to ENTRYPOINT.
docker build . -t herrykun/tutorial.spring
docker push herrykun/tutorial.spring
The image gets now published to dockerhub.
2. Create an NGINX image
NGINX is responsible for the communication over HTTPS. That way, all information regarding HTTPS (certificates, …) is separated from the actual application and can be reused for other applications.
server {
    listen 443 ssl;
    server_name nginx_router;

    ssl_certificate /certs/fullchain.pem;
    ssl_certificate_key /certs/privkey.pem;

    location / {
        proxy_pass http://localhost:8080;

        # Do not change this
        proxy_set_header Host $host;
        proxy_set_header X-Real-IP $remote_addr;
        proxy_set_header X-Forwarded-For $proxy_add_x_forwarded_for;
    }
}
This is a simple configuration file for NGINX. Basically, it configures a server that listens on port 443 (the default port for HTTPS communication). The certificates are expected to lie in the folder /certs. They can be copied there either by using the COPY instruction in the Dockerfile or by mounting a volume to this folder, which was the approach I followed.
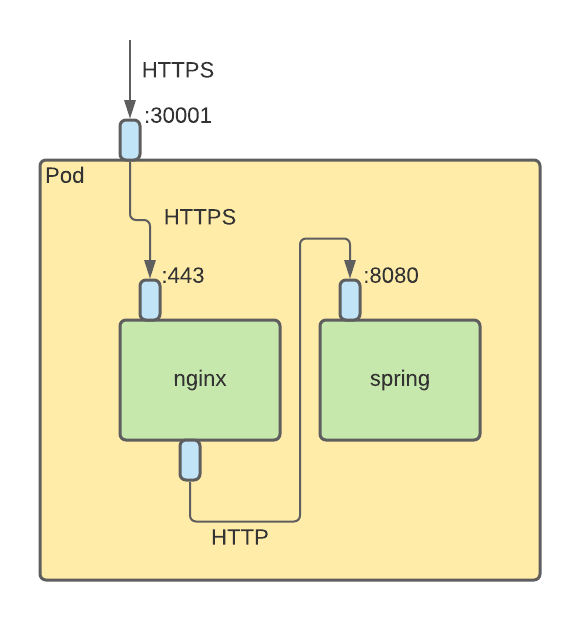
Each request then gets forwarded to port 8080 on the same host. Ultimately, both containers are deployed to the same Pod so that localhost can be used as an address.
FROM nginx
COPY project.conf /etc/nginx/conf.d/
The actual Dockerfile is pretty simple. The base image is nginx, which is a preconfigured NGINX-server. To add the logic from above, the file gets copied into the /etc/nginx/conf.d/ directory, where it will be automatically loaded.
docker build . -t herrykun/tutorial.nginx
docker push herrykun/tutorial.nginx
Finally, the image is again built and pushed to dockerhub.
3. Create Kubernetes Deployment
Now is the time to put everything together.
apiVersion: v1
kind: Service
metadata:
  name: tutorial
  labels:
    run: tutorial
spec:
  ports:
    - port: 443
      targetPort: 443
      nodePort: 30001
  selector:
    app: tutorial
  type: NodePort
The first part of the deployment file defines a Service, which will redirect the requests, that arrive at the master-node to the correct Pods. Under the “ports” section, I configured the Service that incoming requests at port 30001 (external port used in the frontend application) will be forwarded to port 443 on the Pod. The selector ensures that the right Deployments get mapped to the Service.
apiVersion: apps/v1
kind: Deployment
metadata:
  name: tutorial
spec:
  replicas: 1
  selector:
    matchLabels:
      app: tutorial
  template:
    metadata:
      labels:
        app: tutorial
    spec:
      containers:
        - name: spring
          image: herrykun/tutorial.spring

          ports:
            - containerPort: 8080
        - name: nginx
          image: herrykun/tutorial.nginx

          ports:
            - containerPort: 443
          volumeMounts:
            - mountPath: /certs
              name: certs
      nodeName: worker-pointify
      volumes:
        - name: certs
          hostPath:
            path: /host/path/to/certs
            type: Directory
The deployment configuration of the Deployment is pretty straightforward as well. In the general part, configurations like pod-name or number of replicas get defined. The magic happens in “containers”, where the two images from above get added.
First, the spring app. The name of the container is spring, the docker-hub tag is provided as well as the communication port, which is 8080 (the same as the EXPOSE port in the Dockerfile).
Secondly, the NGINX container gets added into a similar way. The name is “nginx” and it listens on port 443 of its container. I added here a volume mount as well, which gets mounted to /certs. The image expects the certificates here, so I provided them via a volumeMount, to swap them as needed without having to touch the container at all.
Finally, the volumeMount referenced above gets defined. It is a hostPath volume, meaning the files stored there, are stored on the same node the Pod is deployed to.
kubectl apply -f deployment.ymlNow the only thing left is to run the deployment on the cluster.